Tuesday 17 December 2013

Checksum Transformation in BIML

Case
Last year we (colleague Marc Potters and me) created a custom Checksum Transformation for SSIS. We use it a lot to compare records from two sources. Instead of comparing a whole bunch of columns in a very large (unreadable and unmaintainable) expression we just compare the hash of both records.

Someone asked me if it was possible to add this custom transformation via BIML. The documentation and examples for custom transformations in BIML are a little limited and of course different for each one.

Solution
Make sure you install the Checksum Transformation. This BIML script uses version 1.3 of the Checksum Transformation in SSIS 2012 and BIDS Helper version 1.6.4. If you use an other version of Checksum or SSIS, then the ComponentClassId, ComponentTypeName and TypeConverter properties will probably have a different GUID or PublicKeyToken. By creating a package manually and viewing the source code you can find the correct values.


       SELECT AddressLine1, AddressLine2, City FROM Address


        0
        Salt123
        
        |


Some browsers don't show capitals in the xml above, but you can download the BIML Script here.


Note 1: If you want to use a variable for the Salt, then you need to know the GUID of the variable. Create a variable in BIML, but with a GUID and use this GUID as Salt_Variable. See step 3 of this blog post.
Note 2: Don't change the names of the InputPath and OutputPath. The transformation is expecting these names.

Monday 16 December 2013

The process cannot acces the file 'ssisproject.ispac' because it is being used by another process.

Case
I want to run an SSIS 2012 package but I'm getting an error:
ispac file in use by other process


System.IO.IOException: The process cannot access the file 'c:\folder\ssisproject.ispac' because it is being used by another process.
     at System.IO.__Error.WinIOError(Int32 errorCode, String maybeFullPath)
     at System.IO.File.Delete(String path)
     at Microsoft.DataTransformationServices.Project.DataTransformationsProjectBuilder.IncrementalBuildThroughObj(IOutputWindow outputWindow)
     at Microsoft.DataTransformationServices.Project.DataTransformationsProjectBuilder.BuildIncremental(IOutputWindow outputWindow)


Solution
You have probably already restarted SSDT, but that didn't help. Open the Task Manager (Ctrl + Shift + Esc) and locate DtsDebugHost.exe under Processes and end that process (could be multiple times, end them all). Now try running the package again.
Task Manager, End SSIS Debug Host


This happens when SSDT/Visual Studio crashes during runtime. If you kill SSDT then the SSIS Debug Host will still be active locking the ISPAC file.


Sunday 10 November 2013

Execute multiple child packages in parallel with loop

Case
I used a foreach loop to execute all my staging packages, but my server isn't using all resources. Is there a way to execute multiple child packages at once, but with a loop?

Executing packages sequentially


Solution
The trick is to use a queue of packages and to have multiple 'processes' taking packages from the queue to execute them. The number of packages that can be executed at a time depends on the complexity of your packages. Staging packages for a single source are not complex, so a good guideline/starting point is to execute one package per processor core.


4 cores => execute 4 child packages at the same time


1) The Queue
For this example I will use a FIFO (first in, first out) queue that is stored in a database table. Alternatives could be the Windows Message Queue or the SQL Service Broker.
-- Create QUEUE table
CREATE TABLE [dbo].[FifoPackageQueue](
 [Id] [bigint] IDENTITY(1,1) NOT NULL,
 [Package] [varchar](50) NULL
) ON [PRIMARY]

GO

-- Add Index on Id
CREATE CLUSTERED INDEX cdxFifoPackageQueue on FifoPackageQueue (Id)

GO

-- Log tabel
CREATE TABLE [dbo].[FifoPackageQueueLog](
 [Id] [bigint] IDENTITY(1,1) NOT NULL,
 [Package] [varchar](50) NULL,
 [StartTime] [datetime] NULL,
 [EndTime] [datetime] NULL
) ON [PRIMARY]

GO


2) Variables and Parameter
For each 'execution line' in my control flow I need one SSIS string variable to store the package name. And I use one Package Parameter to indicate how many execution lines will be active. You can also use an integer variable for that if your SSIS version doesn't have parameters.

String variables, one per execution line


Integer Package Parameter.


3) Fill Queue
In this example I will use an INSERT INTO SELECT query to get all staging packages from SSISDB. You could also use regular INSERT queries or even a Foreach Loop or Script Task that loops through a folder to add packages from the file system to the queue.
INSERT INTO CONV_LOG..FifoPackageQueue
(
     [Package]
)
SELECT      Packages.[name]
FROM        [SSISDB].[internal].[packages] as Packages
INNER JOIN  [SSISDB].[internal].[projects] as Projects
            on Packages.project_version_lsn = Projects.object_version_lsn
WHERE       Projects.name = 'MyProject'
AND         Packages.name like 'STG%';


4) Execution Lines
Each Execution line starts with a Sequence Container connected to the Fill queue task. The Precedence Constraint Expression is @[$Package::ParallelProcesses] >= 1 for the first and @[$Package::ParallelProcesses] >= 2 for the second and so on.
Expression to limit the number of parallel executions


5) Get first package from queue
The Execute SQL Task gets the first package name from the queue and stores it in the SSIS string variable. If the variable is empty then it doesn't continue to the next For Loop.
Output clause is available in SQL 2005


set nocount on;

-- Declare temporary table to store the result of the delete
DECLARE @TmpTable TABLE (Package varchar(50));
-- Declare integer variable for counting the delete result
DECLARE @PackageCount int;

-- Select first record, lock it, delete it and store name in temporary table
WITH cte as (
   SELECT  top(1) Package
   FROM  FifoPackageQueue WITH (rowlock, readpast)
   ORDER BY Id
   )
DELETE FROM cte
output deleted.Package INTO @TmpTable

-- Check if there is 1 record in temporary table
SELECT @PackageCount = count(*) FROM @TmpTable
if @PackageCount = 1
BEGIN
 -- Return package name
 SELECT Package FROM @TmpTable
END
ELSE
BEGIN
 -- Temporary table was empty so queue was empty
 -- Return empty string to stop next precedence constraint
 SELECT '' as Package
END


Store package name in SSIS variable


6) For Loop
The For Loop loops until the package name is empty.
Loop until empty


7) Log starttime
The first Execute SQL Task in the loop inserts the package name and a GETDATE() for the starttime in the log table with an INSERT query. The variable containing the package name is a parameter for this task. A very simple/basic log mechanisme. Adjust it to your needs or remove it if you have an other log mechanism.
INSERT INTO  FifoPackageQueueLog (Package, StartTime)
VALUES   (?, GETDATE())


8) Execute Package Task

Add an expression on the packagename so that it gets replaced with the value of the variable. In the properties of the task set DelayValidation = True. This will prevent errors if your variable is empty.


9) Log endtime
The second Execute SQL Task in the loop logs the enddate with an UPDATE query. The variable containing the package name is a parameter for this task. The start- and enddate will help you choose the optimal number of parallel tasks.
UPDATE  FifoPackageQueueLog
SET   EndTime = GETDATE()
WHERE  Package = ?
AND   EndTime is null

10)  Get next package from queue
This is the exact same task/query as for getting the first package from the queue. If it can't find a package in the queue then it will fill the variable with an empty string and the For Loop will stop.

11) Multiple Execution lines
Repeat steps 4 to 10 an x times. Probably a couple more then you have processor cores in your server. Then start testing to find out the optimal number of parallel tasks.

12) Download example package
For SSIS 2012 I have added an example package for download. It contains 5 execution lines. Add more if you have more cores available. The example is provided for educational purposes only. This example package is not intended to be used in a production environment and has not been tested in a production environment. Test it thoroughly before using it.


Note: you will find a similar solution in the 10 Tips and Tricks for Better SSIS Performance presentation of David Peter Hansen and also in the SQL Rally Amsterdam presentation of Davide Mauri about Automating DWH Patterns Through Metadata. This example package is inspired by their solutions.

Saturday 26 October 2013

Custom Task in BIML Script

Case
I want to add a custom task to my BIML Script. How do you do that in BIML?

Solution

1) Intro
For BIML you first need to install BIDS Helper. At the time of writing the current version of BIDS Helper is 1.6.4. For this example I assume you have basic experience with writing BIML Script and you have installed the Custom Task you want to use in the BIML Script.

2) Create example package
Create an example package with the Custom Task. You need to copy some of the XML code later on. For this example I will use my own custom ZipTask. Two string variables are used for storing the filepath of the sourcefile (that will be zipped) and filepath of the zipfile.
Custom Task with to variables


3) BIML Script Variables
The ZipTask uses two variables and it stores the GUID of those variables in its properties. When I create the variables in the BIML Script I use the same GUID's as in my example package. To get those GUID's click on the variable and go to its properties. Or look it up in the xml code of the example package by right clicking the package in the solution explorer and choose View Code.
BIML Script with two variables with GUID's


4) BIML Script CustomTask
The BIML Script for a custom task is:


You can lookup the value of the CustomTask properties in the XML code of your example package. Search for the DTS:CreationName and DTS:TaskContact properties of your Custom Task. Then copy and paste the exact value to the corresponding property in the BIML Script.
Lookup property values in xml code example package


5) ObjectData
Now we need to fill the ObjectData tag. Go back to the XML code of your example package and search for the ObjectData tag of your custom task. Copy the contents (everything between <DTS:ObjectData and </DTS:ObjectData>) to an advanced text editor like Notepad++ where you can replace the following codes
<    by   &lt;
>    by   &gt;
\r\n by               (Carriage Return + Line Feed by a Space)

Now copy all that code from your text editor to the ObjectData tag within your BIML Script. This text contains all the properties of the custom task including the guid of the two variables.
ObjectData


6) Finish
Now you're ready to generate the package with your custom task.
The Result

Monday 30 September 2013

Create your own custom connection manager

Case
I want to create my own custom SSIS Connection Manager with a GUI. How do you do that?

Solution
A custom connection manager is only for storing properties from a connection. You also need to create custom task or transformation to use those connection manager properties. For this example I will create a very basic connection manager which you can extend for your own needs. It stores a URL, a password and an username. The Connection Manager is for SSIS 2008 and 2012 and I will use Visual Studio 2010 to create it. Programming language is C#. Use this page to translate the code to VB.Net if you prefer that language.
My first SSIS Connection Manager


1) Create Visual Studio project
For my connection manager I used two C# Class Library projects. One for the GUI/editor and one for the code. For SSIS 2008 I will use .Net framework 3.5 and for SSIS 2012 I will use .Net framework 4.0
Two projects for my Connection Manager


2) Create key for strongname
You need to strongname your DLL's so that SSIS can use them. More about that in this Codeguru article: Giving a .NET Assembly a Strong Name. Open the Visual Studio 2010 Command Prompt (in Windows start menu). Browse to your project folder and execute the following command to create a key file: sn.exe -k myConnectionManager.snk

Microsoft (R) .NET Framework Strong Name Utility


3) Add key to project
The key file should be added to both projects.
Add key to projects


And after adding them, you need to sign the projects. Go to the properties of the projects and then to the Signing page. There you can sign the assembly with your newly generated key. Do this for both projects.
Sign Assembly


4) Adding SSIS reference
We need to add references to SSIS libraries. The GUI project needs two references:
  • Microsoft.SqlServer.Dts.Design
  • Microsoft.SQLServer.ManagedDTS
And the code project only needs one reference:
  • Microsoft.SQLServer.ManagedDTS

For SSIS 2008 they can be found in the program files folder. Something like:
C:\Program Files (x86)\Microsoft SQL Server\100\SDK\Assemblies\Microsoft.SQLServer.ManagedDTS.dll
And for SSIS 2012 they are located in the GAC. Something like:
C:\Windows\Microsoft.NET\assembly\GAC_MSIL\Microsoft.SqlServer.ManagedDTS\v4.0_11.0.0.0__89845dcd8080cc91\Microsoft.SqlServer.ManagedDTS.dll
Add references


5) Build Events
To use the connection managers dll's in SSIS you need to copy them to the GAC and to the connections folder of SSIS. With the Build Events you can do that automatically when you build the visual studio project. Go to the properties of your projects and then to the Build Events. Add the following command to the Post-Build events.

2008
cd $(ProjectDir)
@SET CONNECTIONSDIR="C:\Program Files (x86)\Microsoft SQL Server\100\DTS\Connections\"
@SET CONNECTIONSDIR64="C:\Program Files\Microsoft SQL Server\100\DTS\Connections\"
@SET GACUTIL="C:\Program Files (x86)\Microsoft SDKs\Windows\v7.0A\bin\gacutil.exe"

Echo Installing dll in GAC
Echo $(OutDir)
Echo $(TargetFileName)
%GACUTIL% -if "$(OutDir)$(TargetFileName)"

Echo Copying files to Connections 32bit
copy "$(OutDir)$(TargetFileName)" %
CONNECTIONSDIR%
Echo Copying files to Connections 64bit
copy "$(OutDir)$(TargetFileName)" %CONNECTIONSDIR64%

2012
cd $(ProjectDir)
@SET CONNECTIONSDIR="C:\Program Files (x86)\Microsoft SQL Server\110\DTS\Connections\"
@SET CONNECTIONSDIR64="C:\Program Files\Microsoft SQL Server\110\DTS\Connections\"
@SET GACUTIL="C:\Program Files (x86)\Microsoft SDKs\Windows\v7.0A\Bin\NETFX 4.0 Tools\gacutil.exe"

Echo Installing dll in GAC
Echo $(OutDir)
Echo $(TargetFileName)
%GACUTIL% -if "$(OutDir)$(TargetFileName)"

Echo Copying files to Connections 32bit
copy "$(OutDir)$(TargetFileName)" %CONNECTIONSDIR
%

Echo Copying files to Connections 64bit
copy "$(OutDir)$(TargetFileName)" %
CONNECTIONSDIR64%
Post-build events


Make sure you run Visual Studio as Administrator. Otherwise the build events won't work.

6) Icons
I have added the same icon file to both projects. In the properties of the icon file you have to set Build Action to "Embedded Resource". In the UI project you can use the icon in your Windows Form. This will show when you edit the connection manager.
Icon for editor


The other project has an attribute called IconResource which gives Tasks and Transformations there custom icon (see step 9). It should be filled with the assembly name and the icon name. In my project it's "SSISJoost.myConnectionManager" + ".myConnectionManager.ico". Although this is a valid property according to msdn, it doesn't seem to work for Connection Managers. I will post an update if there is a solution or workaround available.


7) Gui project code
To keep everything clear and easy to explain I created a simple connection manager. In the GUI you can add a URL, UserName and password. The password will be a sensitive field so that it wont show in the source code. See the code comments for the explanation.

myConnectionManagerInterface.cs
// C# code
using System;
using System.Collections.Generic;
using System.Linq;
using System.Text;
using System.Windows.Forms;
using Microsoft.SqlServer.Dts.Design;
using Microsoft.SqlServer.Dts.Runtime;
using Microsoft.SqlServer.Dts.Runtime.Design;

// Interface for connection editor
namespace SSISJoost
{
    public class myConnectionManagerInterface : IDtsConnectionManagerUI
    {
        private ConnectionManager _connectionManager;
        private IServiceProvider _serviceProvider;

        public myConnectionManagerInterface()
        {
        
        }

        public void Initialize(ConnectionManager connectionManager, IServiceProvider serviceProvider)
        {
            this._connectionManager = connectionManager;
            this._serviceProvider = serviceProvider;
        }


        public ContainerControl GetView()
        {
            myConnectionManagerEditor editor = new myConnectionManagerEditor();
            editor.ConnectionManager = this._connectionManager;
            editor.ServiceProvider = this._serviceProvider;
            return editor;
        }

        public void Delete(IWin32Window parentWindow)
        {
        }

        public void New(IWin32Window parentWindow)
        {
        }

        public bool Edit(System.Windows.Forms.IWin32Window parentWindow, Microsoft.SqlServer.Dts.Runtime.Connections connections, Microsoft.SqlServer.Dts.Runtime.Design.ConnectionManagerUIArgs connectionUIArg)
        {
            myConnectionManagerEditor editor = new myConnectionManagerEditor();

            editor.Initialize(_connectionManager, this._serviceProvider);
            if (editor.ShowDialog(parentWindow) == DialogResult.OK)
            {
                editor.Dispose();
                return true;
            }
            else
            {
                editor.Dispose();
                return false;
            }
        }

        public bool New(System.Windows.Forms.IWin32Window parentWindow, Microsoft.SqlServer.Dts.Runtime.Connections connections, Microsoft.SqlServer.Dts.Runtime.Design.ConnectionManagerUIArgs connectionUIArg)
        {
            myConnectionManagerEditor editor = new myConnectionManagerEditor();
            
            editor.Initialize(_connectionManager, this._serviceProvider);
            if (editor.ShowDialog(parentWindow) == DialogResult.OK)
            {
                editor.Dispose();
                return true;
            }
            else
            {
                editor.Dispose();
                return false;
            }
        }
    }
}

myConnectionManagerEditor.cs (code behind from windows form)
// C# code
using System;
using System.Collections.Generic;
using System.ComponentModel;
using System.Data;
using System.Drawing;
using System.Linq;
using System.Text;
using System.Windows.Forms;
using Microsoft.SqlServer.Dts.Design;
using Microsoft.SqlServer.Dts.Runtime;
using Microsoft.SqlServer.Dts.Runtime.Design;


namespace SSISJoost
{
    public partial class myConnectionManagerEditor : Form
    {
        #region General Connection Manager Methods
        // Setting and getting ConnectionManager
        private ConnectionManager _connectionManager;
        public ConnectionManager ConnectionManager
        {
            get { return _connectionManager; }
            set { _connectionManager = value; }
        }

        // Setting and getting ServiceProvider
        private IServiceProvider _serviceProvider = null;
        public IServiceProvider ServiceProvider
        {
            get { return _serviceProvider; }
            set { _serviceProvider = value; }
        }

        // Default constructor
        public myConnectionManagerEditor()
        {
            InitializeComponent();
        }
        
        public void Initialize(ConnectionManager connectionManager, IServiceProvider serviceProvider)
        {
            this._connectionManager = connectionManager;
            this._serviceProvider = serviceProvider;
        }
        #endregion

        #region Page Load
        // Fill the fields of the form. Get data from connectionManager object
        private void SMTP2Editor_Load(object sender, EventArgs e)
        {
            this.txtName.Text = this._connectionManager.Name;
            this.txtDescription.Text = this._connectionManager.Description;
            this.txtURL.Text = this._connectionManager.Properties["URL"].GetValue(_connectionManager).ToString();
            this.txtUserName.Text = this._connectionManager.Properties["UserName"].GetValue(_connectionManager).ToString();
            this.txtPassword.Text = this._connectionManager.Properties["Password"].GetValue(_connectionManager).ToString();
        }
        #endregion

        #region Buttons
        // Save value from fields in connectionManager object
        private void btnOK_Click(object sender, EventArgs e)
        {
            this._connectionManager.Name = this.txtName.Text;
            this._connectionManager.Description = this.txtDescription.Text;
            this._connectionManager.Properties["URL"].SetValue(this._connectionManager, this.txtURL.Text);
            this._connectionManager.Properties["UserName"].SetValue(this._connectionManager, this.txtUserName.Text);
            this._connectionManager.Properties["Password"].SetValue(this._connectionManager, this.txtPassword.Text);
            this.DialogResult = DialogResult.OK;
        }

        // Cancel diolog
        private void btnCancel_Click(object sender, EventArgs e)
        {
            this.DialogResult = DialogResult.Cancel;
        }

        // Show some helpful information
        private void btnHelp_Click(object sender, EventArgs e)
        {
            MessageBox.Show("Help");
        }
        #endregion
    }
}


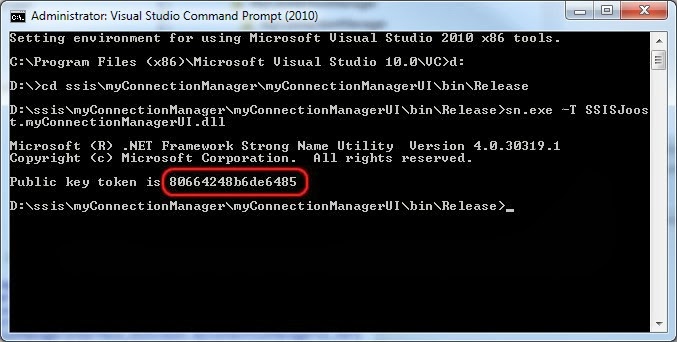
8) Get PublicKeyToken
For the other project you need the PublicKeyToken of the GUI assembly. So first build the GUI project and then, via the same command prompt of step 2, execute the following command in the BIN folder of your GUI project: sn.exe -T SSISJoost.myConnectionManagerUI.dll
Copy the number generated. You need it in the next project.


9) The code for the actual work
This is the code from the project that does the actual storing of the properties in the package XML. See the comments for the explanation.
// C# code
using System;
using System.Collections.Generic;
using System.ComponentModel;
using System.Linq;
using System.Text;
using System.Xml;
using Microsoft.SqlServer.Dts.Runtime;

namespace SSISJoost
{
    // Connection to the editor assembly. Copy the PublicKeyToken from the previous step.
    [DtsConnection(
        ConnectionType = "myConnectionManager",
        DisplayName = "My Connection Manger",
        ConnectionContact = "SSISJoost",
        Description = "My Custom Connection manager",
        //IconResource = "SSISJoost.myConnectionManager.myConnectionManager.ico", // Bug in SSIS => No custom icons for Connection Managers
        UITypeName = "SSISJoost.myConnectionManagerInterface,SSISJoost.myConnectionManagerUI,Version=1.0.0.0,Culture=neutral,PublicKeyToken=80664248b6de6485")
    ]
    public class myConnectionManager : ConnectionManagerBase, IDTSComponentPersist
    {
        #region Variables for internal use
        // The template for the connectionstring, but without the sensitive password property
        private const string CONNECTIONSTRING_TEMPLATE = "URL=<URL>;UserName=<UserName>;";
        #endregion

        #region Get Set Properties
        /*
         * The properties of my connection manager that
         * will be saved in the XML of the SSIS package.
         * You can add a Category and Description
         * for each property making it clearer.
         */
        private string _connectionString = String.Empty;
        public override string ConnectionString
        {
            get
            {
                UpdateConnectionString();
                return _connectionString;
            }
            //connectionstring is now readonly
            //set
            //{
            //    _connectionString = value;
            //}
        }

        private string _url = String.Empty;
        [CategoryAttribute("my connection manager")]
        [Description("Some URL to do something with in an other task or transformation")]
        public string URL
        {
            get { return this._url; }
            set { this._url = value; }
        }

        private string _userName = String.Empty;
        [CategoryAttribute("my connection manager")]
        [Description("The username needed to access the url")]
        public string UserName
        {
            get { return this._userName; }
            set { this._userName = value; }
        }

        // Notice the password property to hide the chars
        private string _password = String.Empty;
        [CategoryAttribute("my connection manager")]
        [Description("The secret password")]
        [PasswordPropertyText(true)]
        public string Password
        {
            get { return this._password; }
            set { this._password = value; }
        }
        #endregion

        #region Overriden methods
        public override object AcquireConnection(object txn)
        {
            // Set the connectionstring
            UpdateConnectionString();
            return base.AcquireConnection(txn);
        }

        public override void ReleaseConnection(object connection)
        {
            base.ReleaseConnection(connection);
        }

        public override DTSExecResult Validate(IDTSInfoEvents infoEvents)
        {
            // Very basic validation example:
            // Check if the URL field is filled.
            // Note: this is a runtime validation
            // In the form you can add some more
            // designtime validation.
            if (string.IsNullOrEmpty(_url))
            {
                infoEvents.FireError(0, "My Custom Connection Manager", "URL is mandatory.", string.Empty, 0);
                return DTSExecResult.Failure;
            }
            else
            {
                return DTSExecResult.Success;
            }
        }
        #endregion

        #region Update ConnectionString
        private void UpdateConnectionString()
        {
            // Create a connectionstring, but without sensitive properties like the password
            String connectionString = CONNECTIONSTRING_TEMPLATE;

            connectionString = connectionString.Replace("<URL>", URL);
            connectionString = connectionString.Replace("<UserName>", UserName);

            _connectionString = connectionString;
        }
        #endregion

        #region Methods for IDTSComponentPersist
        // These two methods are for saving the data in the package XML without showing sensitive data
        void IDTSComponentPersist.LoadFromXML(System.Xml.XmlElement node, IDTSInfoEvents infoEvents)
        {
            // Checking if XML is correct. This might occur if the connection manager XML has been modified outside BIDS/SSDT
            if (node.Name != "MYCONNECTIONMANAGER")
            {
                throw new Exception(string.Format("Unexpected connectionmanager element when loading task - {0}.", "MYCONNECTIONMANAGER"));
            }
            else
            {
                // Fill properties with values from package XML
                this._userName = node.Attributes.GetNamedItem("UserName").Value;
                this._url = node.Attributes.GetNamedItem("URL").Value;


                foreach (XmlNode childNode in node.ChildNodes)
                {
                    if (childNode.Name == "Password")
                    {
                        this._password = childNode.InnerText;
                    }
                }
                this._connectionString = node.Attributes.GetNamedItem("ConnectionString").Value;
            }
        }

        void IDTSComponentPersist.SaveToXML(System.Xml.XmlDocument doc, IDTSInfoEvents infoEvents)
        {
            XmlElement rootElement = doc.CreateElement("MYCONNECTIONMANAGER");
            doc.AppendChild(rootElement);

            XmlAttribute connectionStringAttr = doc.CreateAttribute("ConnectionString");
            connectionStringAttr.Value = _connectionString;
            rootElement.Attributes.Append(connectionStringAttr);

            XmlAttribute userNameStringAttr = doc.CreateAttribute("UserName");
            userNameStringAttr.Value = _userName;
            rootElement.Attributes.Append(userNameStringAttr);

            XmlAttribute urlStringAttr = doc.CreateAttribute("URL");
            urlStringAttr.Value = _url;
            rootElement.Attributes.Append(urlStringAttr);

            if (!string.IsNullOrEmpty(_password))
            {
                XmlElement passwordElement = doc.CreateElement("Password");
                rootElement.AppendChild(passwordElement);
                passwordElement.InnerText = _password;

                // This will make the password property sensitive
                XmlAttribute passwordAttr = doc.CreateAttribute("Sensitive");
                passwordAttr.Value = "1";
                passwordElement.Attributes.Append(passwordAttr);
            }
        }
        #endregion
    }
}

10) The Result
After building / deploying the solution, you need to close/reopen BIDS/SSDT because the GAC is cached on startup. Now you can use your new connection manager. But without any custom tasks or transformations it, it's basically useless... You could use a Script Task to get the connectionstring or a certain property.


11) Download
You can download the complete Visual Studio 2010 example solutions:
SSIS 2008 version
SSIS 2012 version

Note: this is a very basic example. Use it as a base and check other examples like the one below.
More info: MSDNKenR, Matt Masson (twice)

Friday 9 August 2013

Use Visual Studio 2012 for SSIS 2012

Case
I want to use Visual Studio 2012 to edit my SSIS packages, but during installation of Microsoft SQL Server Data Tools - Business Intelligence for Visual Studio 2012,  I get an error:
Rule "Same architecture installation" failed. The CPU architecture of installing feature(s) is different than the instance specified. To continue, add features to this instance with the same architecture.
The CPU architecture of installing feature(s) is different than the instance specified. To continue, add features to this instance with the same architecture.
The CPU architecture of installing feature(s) is different
than the instance specified. To continue, add features
to this instance with the same architecture


Solution
During installation you selected the wrong Installation Type. Although it might not sound logical, you should perform a new installation instead of adding features to the existing instance.
Do NOT add features to an existing instance


For the sake of completeness, lets review all steps.

1) Download
First download Microsoft SQL Server Data Tools - Business Intelligence for Visual Studio 2012

2) Start installation
Start the installer and include any updates.


3) Installation type
Now the important one. Use the default installation type: Perform a new installation of SQL Server 2012.
Perform a new installation of SQL Server 2012

License


4) Features
Select all features and then, Next, next...
Select all features (at least the first)


No errors or warnings this time


5) Finish
Finish the installation and start SQL Server Data Tools (SSDT) for Visual Studio 2012. Now you will see the familiar BI project types.
Finished

New: the BI project templates


6) Color themes
When you install Visual Studio 2012 Update 4 you will get an extra blue color theme which is less depressing then the light grey and dark grey color themes. Or use the Visual Studio 2012 Color Theme Editor for even more color themes.

The color themes of Visual Studio 2012


Tuesday 6 August 2013

Sending mail within SSIS - Part 1: Send Mail Task

Case
I want to send mail within SSIS, preferably HTML formatted. What are the options?

Solutions
There are a couple of solutions to mail within SSIS:
  1. Send Mail Task
  2. Script Task with SmtpClient Class
  3. Execute SQL Task with sp_send_dbmail
  4. Custom Tasks like Send HTML Mail Task or COZYROC

To demonstrate the various solutions, I'm working with these four SSIS string variables. They contain the subject, body, from- and to address. Add these variables to your package and give them a suitable value. You could also use parameters instead if you're using 2012 project deployment.
Add these four variables to your package


A) Send Mail Task
This is the standard task within SSIS to send mail. Good for simple plaintext emails but there are a couple of drawbacks. First see how it works.

1) SMTP Connection Manager
Right click in the Connection Managers window and add an SMTP Connect manager. Add the SMTP server. This is the first drawback. The settings are very limited. Things like port or credentials can't be set.
SMTP Connection manager


2) Send Mail Task
Add the Send Mail Task to the Control Flow (or to an event handler). Give it a suitable name and on the Mail pane at SmtpConnection, select our new Connection Manager.
Select SMTP Connection Manager


3) Expressions
After selecting the Connection Manager (leave rest unchanged) go to the Expressions pane and add an expression on the subject, body, to and from. Use the variables to overwrite these fields. After this click OK to close the editor and test it.
Expressions


4) Testing
Now run the task and check the mailbox. Now you will see the second drawback. The Send Mail Task doesn't support HTML formatted mail. So only plain text.
No HTML Formatting


If you want to overcome the two drawbacks then you have to use one of the other solutions. Next example solution: Script Task

Sending mail within SSIS - Part 2: Script Task

Case
I want to send mail within SSIS, preferably HTML formatted. What are the options?

Solutions
There are a couple of solutions to mail within SSIS:
  1. Send Mail Task
  2. Script Task with SmtpClient Class
  3. Execute SQL Task with sp_send_dbmail
  4. Custom Tasks like Send HTML Mail Task or COZYROC

To demonstrate the various solutions, I'm working with these four SSIS string variables. They contain the subject, body, from- and to address. Add these variables to your package and give them a suitable value. You could also use parameters instead if you're using 2012 project deployment.
Add these four variables to your package


B) Script Task
The Script Task is a little harder to use than the Send Mail Task (if you don't have .Net knowledge), but it doesn't have the same drawbacks as the Send Mail Task. It uses the SmtpClient Class and it has an HTML formatted mail option and a configurable port number.

1) SMTP Connection Manager
This first step is optional. I like to use as much as possible standard connection managers. Right click in the Connection Managers window and add an SMTP Connect manager. Add the SMTP server and change other options if necessary (other options are not used in this example). The alternative is to use an extra SSIS string variable for storing the SMTP Server.
SMTP Connection manager


2) Add Script Task
Add a Script Task to your Control Flow (or one of the event handlers). Give it a suitable name and add the SSIS variables as readonly variables to the Script Task.
Add all SSIS variables as ReadOnly


3) The Script
In the Scipt I'm using the variables and the connection manager to fill the properties of the SMTP client. Copy the contents of the Main method to your method and add the extra import/using on top.
// C# Code
using System;
using System.Data;
using Microsoft.SqlServer.Dts.Runtime;
using System.Windows.Forms;
using System.Net.Mail;          // Added

namespace ST_df6618207373422d961b80ca8b6a56e2
{
    [Microsoft.SqlServer.Dts.Tasks.ScriptTask.SSISScriptTaskEntryPointAttribute]
    public partial class ScriptMain : Microsoft.SqlServer.Dts.Tasks.ScriptTask.VSTARTScriptObjectModelBase
    {
        public void Main()
        {
            // Storing SSIS variables in .Net variables. You could skip this step and call the SSIS variables in the actual mail code
            // to reduce the number of code lines. Or you could fill these .Net variables with hardcoded values.
            String SendMailFrom = Dts.Variables["SendMailFrom"].Value.ToString();
            String SendMailTo = Dts.Variables["SendMailTo"].Value.ToString();
            String SendMailSubject = Dts.Variables["SendMailSubject"].Value.ToString();
            String SendMailBody = Dts.Variables["SendMailBody"].Value.ToString();

            // Get SMTP Server from SMTP Connection Manager. Alternative is to use extra variables or paramters instead:
            // String SmtpServer = Dts.Variables["SmtpServer"].Value.ToString();
            String SmtpServer = Dts.Connections["My SMTP Connection Manager"].Properties["SmtpServer"].GetValue(Dts.Connections["My SMTP Connection Manager"]).ToString();

            // Create an email and change the format to HTML
            MailMessage myHtmlFormattedMail = new MailMessage(SendMailFrom, SendMailTo, SendMailSubject, SendMailBody);
            myHtmlFormattedMail.IsBodyHtml = true;

            // Create a SMTP client to send the email
            SmtpClient mySmtpClient = new SmtpClient(SmtpServer);
            mySmtpClient.Port = 2525; // If you want to use a different portnumber instead of the default. Else remove this line.
            mySmtpClient.Send(myHtmlFormattedMail);

            // Close Script Task with success
            Dts.TaskResult = (int)ScriptResults.Success;
        }

        #region ScriptResults declaration

        enum ScriptResults
        {
            Success = Microsoft.SqlServer.Dts.Runtime.DTSExecResult.Success,
            Failure = Microsoft.SqlServer.Dts.Runtime.DTSExecResult.Failure
        };
        #endregion
    }
}

or use VB.Net code

' VB.Net Code
Imports System
Imports System.Data
Imports System.Math
Imports Microsoft.SqlServer.Dts.Runtime
Imports System.Net.Mail             ' Added

<Microsoft.SqlServer.Dts.Tasks.ScriptTask.SSISScriptTaskEntryPointAttribute()> _
<System.CLSCompliantAttribute(False)> _
Partial Public Class ScriptMain
    Inherits Microsoft.SqlServer.Dts.Tasks.ScriptTask.VSTARTScriptObjectModelBase

    Public Sub Main()
        ' Storing SSIS variables in .Net variables. You could skip this step and call the SSIS variables in the actual mail code
        ' to reduce the number of code lines. Or you could fill these .Net variables with hardcoded values.
        Dim SendMailFrom As String = Dts.Variables("SendMailFrom").Value.ToString()
        Dim SendMailTo As String = Dts.Variables("SendMailTo").Value.ToString()
        Dim SendMailSubject As String = Dts.Variables("SendMailSubject").Value.ToString()
        Dim SendMailBody As String = Dts.Variables("SendMailBody").Value.ToString()

        ' Get SMTP Server from SMTP Connection Manager. Alternative is to use extra variables or paramters instead:
        ' Dim SmtpServer as String = Dts.Variables("SmtpServer").Value.ToString();
        Dim SmtpServer As String = Dts.Connections("My SMTP Connection Manager").Properties("SmtpServer").GetValue(Dts.Connections("My SMTP Connection Manager")).ToString()

        ' Create an email and change the format to HTML
        Dim myHtmlFormattedMail As New MailMessage(SendMailFrom, SendMailTo, SendMailSubject, SendMailBody)
        myHtmlFormattedMail.IsBodyHtml = True

        ' Create a SMTP client to send the email
        Dim mySmtpClient As New SmtpClient(SmtpServer)
        mySmtpClient.Port = 2525 ' If you want to use a different portnumber instead of the default. Else remove this line.
        mySmtpClient.Send(myHtmlFormattedMail)

        ' Close Script Task with success

        Dts.TaskResult = ScriptResults.Success
    End Sub

#Region "ScriptResults declaration"
    'This enum provides a convenient shorthand within the scope of this class for setting the
    'result of the script.

    'This code was generated automatically.
    Enum ScriptResults
        Success = Microsoft.SqlServer.Dts.Runtime.DTSExecResult.Success
        Failure = Microsoft.SqlServer.Dts.Runtime.DTSExecResult.Failure
    End Enum

#End Region

End Class

4) The result
Close the Script Task and execute it: An email message with html formatting!
HTML formatted email


If you're not into .Net, but really like TSQL then check out the next solution: Execute SQL Task with sp_send_dbmail

Sending mail within SSIS - Part 3: Execute SQL Task

Case
I want to send mail within SSIS, preferably HTML formatted. What are the options?

Solutions
There are a couple of solutions to mail within SSIS:
  1. Send Mail Task
  2. Script Task with SmtpClient Class
  3. Execute SQL Task with sp_send_dbmail
  4. Custom Tasks like Send HTML Mail Task or COZYROC

To demonstrate the various solutions, I'm working with these four SSIS string variables. They contain the subject, body, from- and to address. Add these variables to your package and give them a suitable value. You could also use parameters instead if you're using 2012 project deployment.
Add these four variables to your package


C) Execute SQL Task
The Execute SQL Task solution uses a stored procedure from SQL Server. To use that you first have to configure database mail in SSMS.

1) Database Mail Wizard
Open SQL Server Management Studio (SSMS). Go to Management and then to Database Mail.
Database Mail


2) Enable Database Mail
If Database Mail isn't available it will ask for it. Choose the first option to create a profile.
Enable Database Mail and create profile


3) Create Profile
Enter a name and description for the mail profile. You will need the name in the stored procedure later on.
Create a mail profile


4) New Database Mail Account
Click the Add button to create a new database mail account. This is where you configure the SMTP server and the FROM address.

Configure SMTP and FROM address


Account ready, continue wizard


5) Public / Private
Make your profile public (or private)
Public profile


6) System Parameters
Configure the System Parameters like max attachment size.
Configure System Parameters


7)  Finish wizard
Now finish the wizard and go back to SSIS / SSDT.
Finish

Close


8) Add OLE DB Connection Manager
Add an OLE DB Connection Manager and connect to the server where you configured DatabaseMail.
OLE DB Connection Manager


9) Add Execute SQL Task
Add an Execute SQL Task to the Control Flow or an Event Handler. Edit it and select the new connection manager. In the SQLStatement field we are executing the sp_send_dbmail stored procedure with some parameters to get the, subject, body and from address from the SSIS variables.

' Stored Procedure with parameters
EXEC msdb.dbo.sp_send_dbmail
    @profile_name = 'SSIS Joost Mail Profile',
    @recipients = ?,
    @subject = ?,
    @body = ?,
    @body_format = 'HTML' ;

sp_send_dbmail in SSIS


10) Parameters
Go to the Parameter Mapping pane and add the SSIS string variables as parameters. We can't configure the FROM address because we did that already in SSMS (Step 4).
Parameters


11) The result
Now execute the Execute SQL Task and watch your mailbox.

An email with html formatting


If you don't like this solution, check out the Script Task solution or the third party tasks.
Related Posts Plugin for WordPress, Blogger...